The process of going live it is simple but it may cause some people a headache while trying to go live. It is the process which one uses to enable their application to carry out requests on the live API and begin processing client payments through various methods like C2B – Customer to business – This is the normal paybill and and till number service, or STK Push. For this process, you require at least the following two items already existing:
- Paybill Number
This is the shortcode which you received after you registered to use MPesa services.
Business Administrator/Business Manager
These are admin users on your Mpesa Org portal who have the roles of either the Business Administrator or the Business Manager assigned to them. To confirm who this is, you can try to follow the steps below on the Mpesa Org Portal:
- – Log into the Mpesa Org portal using the shortcode which you shall use in the Go Live process using an admin user.
- – Check if you have the Browse Organization menu at the top of the screen. If not, you are not an admin, log out. If you have it, click on it.

Browse Org Menu Item
– Click on the Operators sub-menu on the bar that appears on the left of the screen
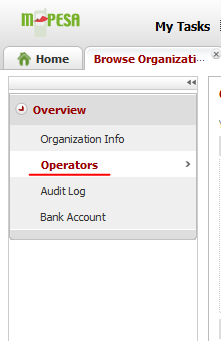
Operators Menu Item
– A list will appear showing all the users on your portal, and their roles. From this list, check on the Role column and see if anyone has the Business Administrator/Manager role on them. You can also click on the Operation icon at their far right on the list to see their profile and the complete list of roles assignable to them. That user with the Business Administrator/Manager role is the required one for the Go Live process.

Roles List
– Open the Business Administrator/Manager user’s details by clicking the Operation icon at the far right. Once there, click on the KYC tab and confirm that the following details are there:
- Identity Status is Active
- Preferred Contact Phone Number (starting with 2547XX)
- Notification Receiving MSISDN (starting with 2547XX)
- Notification Receiving E-Mail
- ID type and Number
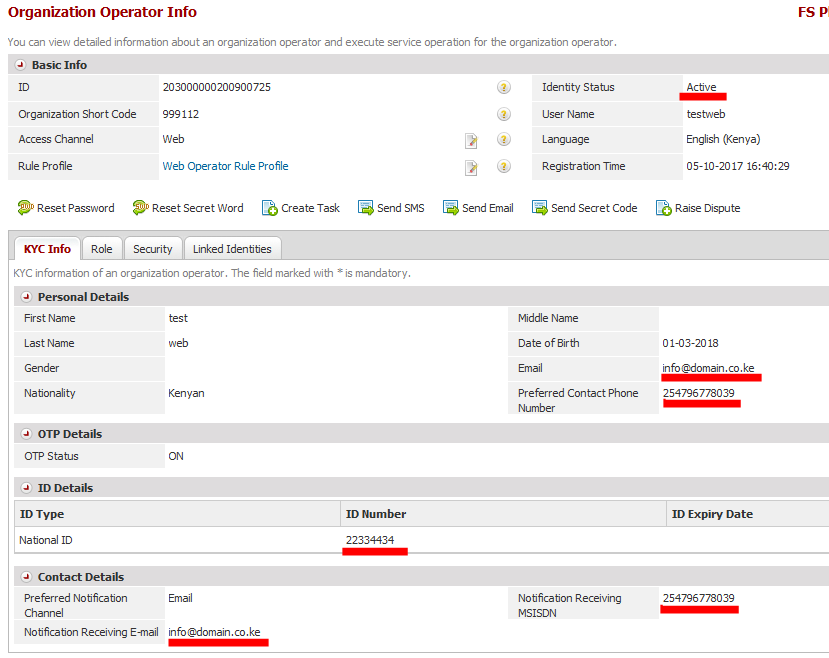
Operator Details
These details will be used for verification during the Go Live journey.
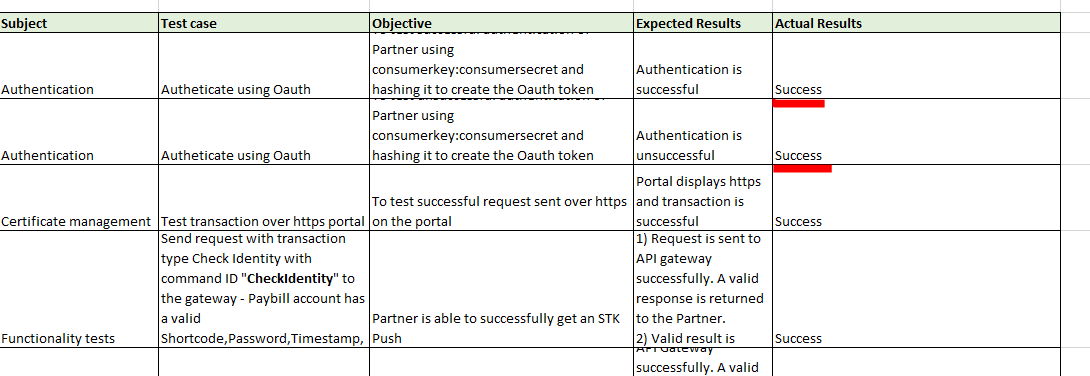
After confirming the above details, you may start the process. On the first step of the Go Live process, you shall be required to download and fill in a form specifying how your tests went along. These cases consist of the possible scenarios which you shall encounter as you test your application. The test cases just need a simple Success or Fail response on the Actual Results tab. I doubt if you will have a Fail on that file anyways. You can just download and re-upload as it is.
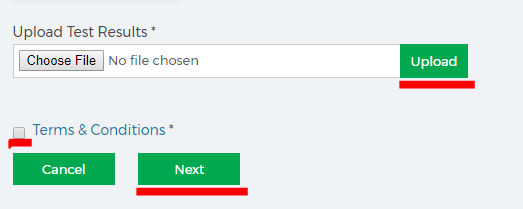
Once downloaded and filled, go back to the same Page and upload the form via the Upload Test Results form, click on Upload, then after the form has been picked up, check the Terms and Conditions checkbox, then click on Next.
[the_ad id=”19381″]
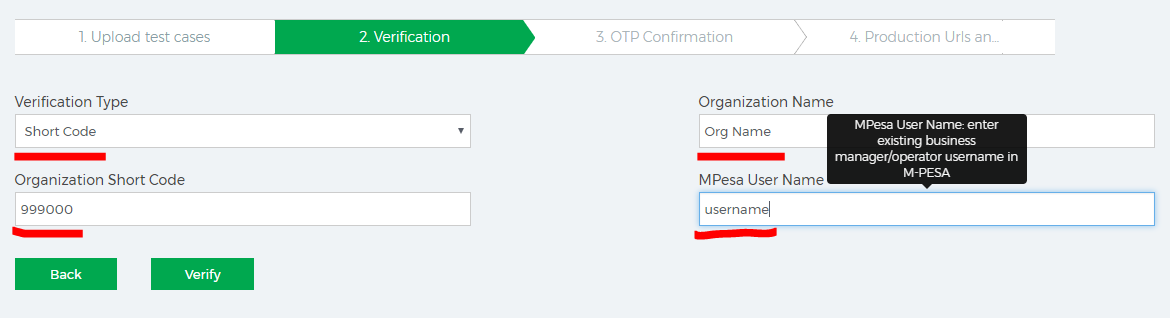
On the Verification section, you shall need to confirm your ownership of the paybill you are taking live. This will require you to enter your paybill and your contact details, receive a One Time Pin (OTP) on your registered Mobile Phone, then put that OTP on the portal to confirm your authenticity. On that page, you shall select Verification type as Short Code (only one supported for now), Organization Name as the name of the Organization as registered on MPesa, your Organization ShortCode, and the username of either the Business Administrator or Business Manager as filled in on the Org Portal (that’s why I had you confirm the details exist first). Without either of these, the process will fail as there will be no contact phone to send you the OTP or the email to send the production URLs.
Once you click on Submit, and MPesa confirms the details you put as correct, it will send an OTP to the Phone Number registered on the Org Portal under the User whose username was filled on the verification form. Once you get the OTP on your phone (you might need a few retries), you shall fill it on the next section, the OTP Confirmation section. From the docs, the OTP has an expiry timeout of 3 minutes, thus you need to be fast, or you can just click on Resend OTP. Once the OTP has been confirmed, you shall then be given the chance to select the APIs you are applying for (note the limitations mentioned in the API Apps section). After completing the section, there shall also be created automatically the production apps for your account. These apps need to be approved internally, then after approval, you shall have the production URLs sent to the email registered against the same user who applied for Verification in step 2 of the process. You will then have the new Consumer Keys and Consumer Secrets for your app ready for use in production. More on this process can be found on the official site. For password creation, you can follow the steps given in this document.